supervisor使用

Supervisor 是一个 CS 模式系统,允许用户在类 UNIX 系统上监测和管理一定数量的进程,还支持 Web 界面管理进程。它的目标与 launchd, daemontools 和runit 有些相似, 但是与它们不一样的是, 它不是作为 init (进程号pid是1)运行. 它是被用来控制进程, 并且它在启动的时候和一般程序并无二致。
supervisord 还要求管理的程序是非 daemon 程序,supervisord 会帮你把它转成 daemon 程序, Monit 和 Supervisord 的一个比较大的差异是 Supervisord 管理的进程必须由 Supervisord来启动,Monit 可以管理已经在运行的程序

一、安装 Supervisor

Supervisor 是由 python 编写的,先安装 python 和 pip (python 包管理工具)

1
yum install epel* python python-pip -y

用 pip 安装 supervisor

1
pip install supervisor

安装后,会出现2个可执行文件:
/usr/bin/supervisord – supervisor 服务守护进程
/usr/bin/supervisorctl – supervisor 控制台进程

生成默认配置文件

1
echo_supervisord_conf > /etc/supervisord.conf

二、配置 Supervisor

这里以 Nginx 为例介绍怎么管理应用进程

1、安装 nginx

1
yum -y install nginx      # 安装 nginx

设置 nginx 不以后台模式运行
1
sed -i.bak '/worker_processes/a daemon off;' /etc/nginx/nginx.conf

2、设置 supervisord
主要通过修改其主配置文件实现

1
vim /etc/supervisord.conf

1
2
3
4
5
6
7
8
9
10
11
12
13
14
15
16
17
18
19
20
21
22
23
24
25
26
27
28
29
30
31
32
33
34
35
36
37
38
[inet_http_server]             ; 开启TCP/IP http 服务器
port=192.168.18.10:9001 ; 侦听端口
username=user ; 认证用户名
password=123 ; 密码

[supervisord]
logfile=/tmp/supervisord.log ; 日志输出文件
logfile_maxbytes=50MB ; 日志最大空间
logfile_backups=10 ; 日志轮转保留数
loglevel=info ; (日志等级; default info; others: debug,warn,trace)
pidfile=/tmp/supervisord.pid ; (pid文件; default supervisord.pid)
nodaemon=false ; (前台运行 ;default false)
minfds=1024 ; (最小文件描述符数 ;default 1024)
minprocs=200 ; (最小进程数 ;default 200)

[rpcinterface:supervisor] ; rpc 接口
supervisor.rpcinterface_factory = supervisor.rpcinterface:make_main_rpcinterface

[supervisorctl] ; 控制台设置
erverurl=unix:///tmp/supervisor.sock ; socket 访问路径
serverurl=http://192.168.18.10:9001 ; URL 访问路径
username=user ; 使用的认证用户名 (上同)
password=123 ; 密码
prompt=mysupervisor ; cmd line prompt (default "supervisor")
history_file=~/.sc_history ; use readline history if available


[program:nginx]
command=/usr/local/nginx/sbin/nginx -c /etc/nginx/nginx.conf ; 程序路径
autorestart=true ; 自动重启
priority=999 ; 优先级
startsecs=1 ; 重启前等待时间
startretries=100 ; 最大重启次数
stdout_logfile=/tmp/supervisor/nginx/nginx.log ; 日志文件
stdout_logfile_maxbytes=10MB ; 日志文件最大容量
stderr_logfile=/tmp/supervisor/nginx/nginx_err.log ; 错误日志文件
stderr_logfile_maxbytes=1MB ; 错误日志文件最大容量


创建日志目录,设置权限
1
2
mkdir -p /tmp/supervisor/nginx/
chown -R nginx:nginx /tmp/supervisor/nginx/

启动 supervisord 的后台进程:

1
supervisord -c /etc/supervisord.conf

加入开机启动项

1
echo "supervisord -c /etc/supervisord.conf" >> /etc/rc.local

防火墙上放行 Web 端口

1
2
iptables -I INPUT -m state --state NEW -p tcp --dport 9001 -j ACCEPT
service iptables save

三、管理界面介绍

1
2
3
4
5
supervisorctl start nginx  # 启动 nginx
supervisorctl start all # 启动所有进程
supervisorctl status # 查看进程状态
supervisorctl tail -f ssserver stderr # debug查看日志

也可使用交互模式管理进程:

1
2
3
4
5
6
7
8
9
supervisorctl
nginx RUNNING pid 4883, uptime 0:02:03
mysupervisor>
mysupervisor> help
default commands (type help <topic>):
=====================================
add clear fg open quit remove restart start stop update
avail exit maintail pid reload reread shutdown status tail version


还可使用 Web 界面管理
Web 界面管理
测试:
1
2
3
4
5
6
7
lsof -i:80 # 查看到此时的 PID 为 1677
COMMAND PID USER FD TYPE DEVICE SIZE/OFF NODE NAME
nginx 1677 root 6u IPv4 29067 0t0 TCP *:http (LISTEN)
nginx 1678 nginx 6u IPv4 29067 0t0 TCP *:http (LISTEN)

[root@Srv-A meld3-1.0.2]# killall nginx #关闭所有 nginx 进程:
[root@Srv-A meld3-1.0.2]# lsof -i:80 # 此时,已经生成了新的 PID 1681

Debug:

生成配置文件时

1
supervisord -c /etc/supervisord.conf

出现:
1
2
3
4
5
6
7
8
Traceback (most recent call last):
File "/usr/bin/echo_supervisord_conf", line 5, in <module>
from pkg_resources import load_entry_point
File "/usr/lib/python2.6/site-packages/setuptools-0.6c11-py2.6.egg/pkg_resources.py", line 2603, in <module>
File "/usr/lib/python2.6/site-packages/setuptools-0.6c11-py2.6.egg/pkg_resources.py", line 666, in require
File "/usr/lib/python2.6/site-packages/setuptools-0.6c11-py2.6.egg/pkg_resources.py", line 565, in resolve
pkg_resources.DistributionNotFound: meld3>=0.6.5


解决方法:pip安装的meld3不可用,手动安装。
1
2
3
4
wget https://pypi.python.org/packages/source/m/meld3/meld3-1.0.2.tar.gz
tar -zxf meld3-1.0.2.tar.gz
cd meld3-1.0.2
python setup.py install

参考:
http://supervisord.org/
http://supervisord.org/installing.html

[hexo]升级与迁移

1.起因

是升级到ubuntu 16之后使用hexo遇到错误:
(node:15317) [DEP0061] DeprecationWarning: fs.SyncWriteStream is deprecated.

分析:升级系统之后node版本也有升级, 然后fs.SyncWriteStream这个方法被废弃了,我们只要升级hexo博客同时保留数据就可以了。在查找资料的时候我发现一个很好的管理hexo博客的方法(使用hexo,如果换了电脑怎么更新博客? - 回答作者: CrazyMilk),将hexo博客的源码放到了github page的仓库里,于是我索性升级和迁移一起做了。

OLD OS:

1
2
3
4
5
6
7
8
9
10
11
12
www@v-ubuntu:~/git_repo/hexo_blog$ hexo version
hexo: 3.3.7
hexo-cli: 1.0.3
os: Linux 4.4.0-87-generic linux x64
http_parser: 2.5.0
node: 4.2.4
v8: 4.5.103.35
uv: 1.7.5
zlib: 1.2.8
ares: 1.10.1-DEV
modules: 46
openssl: 1.0.2e

NEW OS:
1
2
3
4
5
6
7
8
9
10
11
12
13
14
15
16
17
18
hubery@hubery-VirtualBox:~/Workspace/hexo_blog$ hexo version
(node:17263) [DEP0061] DeprecationWarning: fs.SyncWriteStream is deprecated.
hexo: 3.3.7
hexo-cli: 1.0.3
os: Linux 4.10.0-35-generic linux x64
http_parser: 2.7.0
node: 8.6.0
v8: 6.0.287.53
uv: 1.14.1
zlib: 1.2.11
ares: 1.10.1-DEV
modules: 57
nghttp2: 1.25.0
openssl: 1.0.2l
icu: 59.1
unicode: 9.0
cldr: 31.0.1
tz: 2017b

2.更新流程

1.github page仓库:huberyhe.github.io
2.hexo blog源码仓库:~/Workspace/hexo_blog
3.hexo安装:

1
2
3
$ curl -o- https://raw.githubusercontent.com/creationix/nvm/v0.33.2/install.sh | bash
$ nvm install stable
$ npm install -g hexo-cli

4.克隆github page仓库, 创建hexo空白分支用于存放hexo源码
1
2
3
4
$ cd ~/Workspace
$ git clone github:huberyhe/huberyhe.github.io.git
$ cd huberyhe.github.io/
$ git checkout --orphan gh-pages

5.初始化hexo博客,拷贝旧仓库的数据部分
1
2
3
4
5
$ hexo init
$ cp ../hexo_blog/source ../hexo_blog/themes ../hexo_blog/_config.yml ../hexo_blog/package.json ../hexo_blog/new_from_md.sh ./ -Ra
$ git add -A
$ git commit -m "add branch hexo with hexo original files"
$ git push origin hexo

5.在huberyhe.github.io上,将hexo设为默认分支
6.在本地对博客进行修改(添加新博文、修改样式等等)后,通过下面的流程进行管理

  1. 依次执行git add .git commit -m "..."git push origin hexo指令将改动推送到GitHub(此时当前分支应为hexo)
  2. 然后才执行hexo g -d发布网站到master分支上。

参考:
Hexo报错,DEP0061
将 HEXO 从 Ubuntu 迁移到 windows
使用hexo,如果换了电脑怎么更新博客? - 回答作者: CrazyMilk
Hexo Getting Started
git中创建新的空白分支

oh-my-zsh配置

oh-my-zsh是做什么的

开源的zsh配置工具,它的主题和插件系统可以为zsh扩展外观和很多有用的功能,官方是这样介绍的:

Oh-My-Zsh is an open source, community-driven framework for managing your ZSH configuration. It comes bundled with a ton of helpful functions, helpers, plugins, themes, and a few things that make you shout…

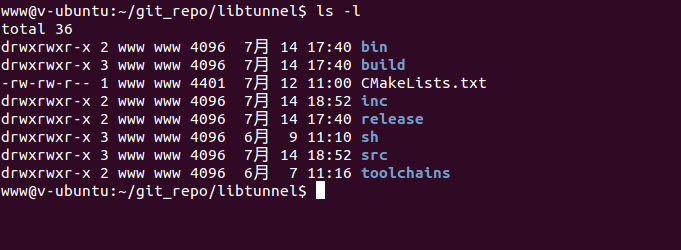
Ubuntu默认的终端样式,用了很久,其实也不差

默认bash
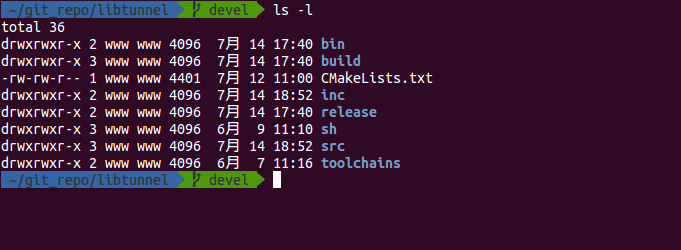
但是用上oh-my-zsh后,更加美观且实用

使用oh-my-zsh

安装zsh

1.安装zsh:sudo apt install zsh
2.确认安装:zsh --version
3.设置为默认shell:sudo chsh www -s $(which zsh)
4.注销重新登陆

安装和配置oh-my-zsh

默认的zsh很简陋,就不截图了
1.安装:sh -c "$(curl -fsSL https://raw.github.com/robbyrussell/oh-my-zsh/master/tools/install.sh)"
2.设置主题为agnoster: vim ~/.zshrc

1
ZSH_THEME="agnoster"

3.默认用户下隐藏user@hostname: vim ~/.zshrc
1
export DEFAULT_USER="www"

安装字体支持

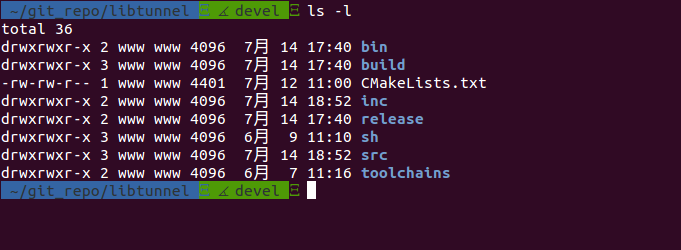
此时终端是这样的,因为字体不支持,显示很奇怪

缺少字体
angoster这个主题需要Powerline-patched font这个字体才能正常
1.安装

1
2
3
4
5
6
7
8
# clone
git clone https://github.com/powerline/fonts.git
# install
cd fonts
./install.sh
# clean-up a bit
cd ..
rm -rf fonts

2.设置终端字体
打开Edit->Profiles->Default->Edit->Font, 选择Ubuntu Mono derivative Powerline

至此完成了最简单的配置,感受飞起的命令行吧!

加速,解决卡慢问题

由于获取仓库信息比较耗时,解决方法:

1、设置不读取文件变化信息

1
git config --add oh-my-zsh.hide-dirty 1

2、设置不读取任何git信息

1
git config --add oh-my-zsh.hide-status 1

参考:
oh-my-zsh
Themes
agnoster.zsh-theme
Powerline fonts
Ubuntu 下安装oh-my-zsh

[hexo]导入markdown文件

习惯用markdown记笔记,然后导入到hexo,实际上之前写了许多markdown笔记需要导入,那么一般的流程是这样的:
1.hexo new blog_name
2.cat note.md >> source/_posts/blog_name.md
3.edit tags of blog_name.md

我写了一个shell脚本(new_from_md.sh)去简化操作:

1
2
3
4
5
6
7
8
9
10
11
12
13
14
15
16
17
18
19
20
21
22
23
24
25
26
27
28
29
30
31
32
33
34
35
36
37
38
39
#!/bin/bash

if [[ $# -lt 1 ]]; then
echo "Usage: $0 markdown_file"
exit 1
fi

tag_line=4
markdown_file=$1

if [[ ! -f $markdown_file ]]; then
echo "file $markdown_file not exist!"
exit 2
fi

u_home=$(echo ~)
posted_file=$(basename $markdown_file | sed 's/.md$//' | awk '{print "\""$0"\""}' | xargs hexo new | tee /dev/stderr | awk '{print $NF}' | sed 's@^~@'"${u_home}"'@')

if [[ ! -f $posted_file ]]; then
echo "file $posted_file not exist!"
exit 2
fi

echo "cat $markdown_file >> $posted_file"
cat $markdown_file >> $posted_file

hexo list tag

read -p "tag(muti tags with ';'): " tag_list
if [[ $tag_list != "" ]]; then
for tag in `echo $tag_list | sed 's/;$//' | sed 's\;\ \g'`; do
sed -i "${tag_line}a- ${tag}" $posted_file
let tag_line=$tag_line+1
done
fi

# hexo d -g

echo "Done!"

脚本会尝试用md文件markdown_file的名字当作hexo文章的名称posted_file,当然md文件和hexo文章的名称不一定是一样的,hexo会重新格式化;然后把markdown_file的内容cat到posted_file的后面;最后列出hexo已有的tag,并让用户指定这篇文章的tag。

用法与用量:

1
2
3
4
5
6
7
8
9
10
11
12
www@v-ubuntu:~/git_repo/hexo_blog$ ./new_from_md.sh ~/markdown/systemd.md
INFO Created: ~/git_repo/hexo_blog/source/_posts/systemd.md
cat /home/www/markdown/systemd.md >> /home/www/git_repo/hexo_blog/source/_posts/systemd.md
INFO Start processing
Name Posts Path
Linux 1 tags/Linux/
MySQL 1 tags/MySQL/
editer&ide 1 tags/editer-ide/
life 1 tags/life/
tag(muti tags with ';'): Linux
Done!
www@v-ubuntu:~/git_repo/hexo_blog$

systemd

##实例

###配置文件

1
2
3
4
5
6
7
8
9
10
11
12
13
14
15
16
[Unit]
Description=uWSGI Emperor
After=syslog.target

[Service]
ExecStart=/root/uwsgi/uwsgi --ini /etc/uwsgi/emperor.ini
# Requires systemd version 211 or newer
RuntimeDirectory=uwsgi
Restart=always
KillSignal=SIGQUIT
Type=notify
StandardError=syslog
NotifyAccess=all

[Install]
WantedBy=multi-user.target

保存为 /etc/systemd/system/emperor.uwsgi.service; 或保存为/usr/lib/systemd/system/emperor.uwsgi.service,然后 systemctl enable emperor.uwsgi.service,这将创建同等软链接。

###启动与关闭、重启动

1
2
3
4
systemctl start emperor.uwsgi.service
systemctl stop emperor.uwsgi.service
systemctl restart emperor.uwsgi.service
systemctl status emperor.uwsgi.service

参考:
阮一峰的网络日志>>Systemd 入门教程:命令篇
Linux运维笔记>>systemd详解
systemd详解
systemd.service
RuntimeDirectory= creates directory with wrong group if Group= is set

[hexo]添加搜索引擎收录

默认状态下huberyhe.github.io没有被搜索引擎收录,谷歌和百度并不知道这个网站的存在,这需要我们分别到谷歌和百度的站长工具里提交我们的网址,为了让他们确信我们是这个网址的所有者,我们需要按他们的要求在网站用添加特殊的标记。
常见的有文件验证和html标签验证,对于hexo搭建的网站,使用html标签更加直白。
html标签验证需要我们在首页html的head部添加类似以下格式的标签,其中content的内容是域唯一的。

1
2
<meta name="google-site-verification" content="n3vW5VWa0dZmPY-AA8UAp01xuVPkN5_IiepW50blPDA">
<meta name="baidu-site-verification" content="bNiXz6eKG6">


以下步骤是将这类标签更加合理地添加到hexo博客中的一种方式。

1.在hexo的配置文件中添加必须的字段

1
2
cd hexo_blog
vim _config.yml

添加:

1
2
3
4
# Site Varifycation
site_verification:
google: ABCDEFG_XYZ
baidu: ABCDEFG_XYZ

2.编辑主题

1
vim themes/oishi/layout/_partial/head.ejs

<head></head>之间添加

1
2
3
4
5
6
<% if (config.site_verification.google){ %>
<meta name="google-site-verification" content="<%= config.site_verification.google %>" />
<% } %>
<% if (config.site_verification.baidu){ %>
<meta name="baidu-site-verification" content="<%= config.site_verification.baidu %>" />
<% } %>

3.验证

提交上传之后就可以通过验证,并且很快就可以在搜索引擎中搜索到huberyhe.github.io(百度要慢一些)

[vscode]Linter pylint is not installed

vscode打开python项目时提示:Linter pylint is not installed
原因分析:没有安装或没有找到pylint模块,pylint是python代码风格检查工具


1.打开终端(Ctrl+~)
2.安装pylint:sudo -H pip install pylint
3.如果已经安装或者安装之后无效,是因为vscode默认的python目录和系统使用的python目录不一致,我的是升级安装到/usr/local/python2.7.12目录下的。
4.打开vscode设置File->Preference->Settings(Ctrl+,)
5.定位到Python Configuration
6.找到以下两个项目,Copy to Settings

1
2
"python.linting.pylintPath": "pylint",
"python.pythonPath": "python"

7.在USER SETTINGS中将这两个项目设置到正确的路径
1
2
"python.linting.pylintPath": "/usr/local/python2.7.12/bin/pylint",
"python.pythonPath": "/usr/local/python2.7.12/bin/python"

8.或者你想把linting功能(错误检查)关掉
1
"python.linting.pylintEnabled": false


参考:Linter pylint is not installed

CentOS 7下MySQL安装配置

安装:

1
2
3
4
#centos 7
yum install -y mariadb mariadb-server mariadb-devel
#debian 8
apt-get install nginx mariadb-server mariadb-client libmariadbclient-dev python-dev libssl-dev

启动与开机启动:

1
2
systemctl start mysqld
systemctl enable mariadb

配置

初始状态下,在终端中输入mysql就可以直接进入数据库,进而可以更改root密码。

1
2
3
4
5
6
7
8
9
10
11
12
13
14
15
16
17
18
19
20
21
22
23
24
25
26
27
28
29
30
31
[root@DptServer2 hubery]# mysql
Welcome to the MariaDB monitor. Commands end with ; or \g.
Your MariaDB connection id is 2
Server version: 5.5.47-MariaDB MariaDB Server

Copyright (c) 2000, 2015, Oracle, MariaDB Corporation Ab and others.

Type 'help;' or '\h' for help. Type '\c' to clear the current input statement.

MariaDB [(none)]>
MariaDB [(none)]>
MariaDB [(none)]>
MariaDB [(none)]> show databases;
+--------------------+
| Database |
+--------------------+
| information_schema |
| mysql |
| performance_schema |
| test |
+--------------------+
4 rows in set (0.00 sec)

MariaDB [(none)]> use mysql;
Reading table information for completion of table and column names
You can turn off this feature to get a quicker startup with -A

Database changed
MariaDB [mysql]> exit
Bye


mysql提供了一套安全的初始化操作,使用/usr/bin/mysql_secure_installation命令。
1
2
3
4
5
6
7
8
9
10
11
12
13
14
15
16
17
18
19
20
21
22
23
24
25
26
27
28
29
30
31
32
33
34
35
36
37
38
39
40
41
42
43
44
45
46
47
48
49
50
51
52
53
54
55
56
57
58
59
60
61
62
63
[root@DptServer2 hubery]# mysql_secure_installation
/bin/mysql_secure_installation: line 379: find_mysql_client: command not found

NOTE: RUNNING ALL PARTS OF THIS SCRIPT IS RECOMMENDED FOR ALL MariaDB
SERVERS IN PRODUCTION USE! PLEASE READ EACH STEP CAREFULLY!

In order to log into MariaDB to secure it, we'll need the current
password for the root user. If you've just installed MariaDB, and
you haven't set the root password yet, the password will be blank,
so you should just press enter here.

Enter current password for root (enter for none):
OK, successfully used password, moving on...

Setting the root password ensures that nobody can log into the MariaDB
root user without the proper authorisation.

Set root password? [Y/n] Y
New password:
Re-enter new password:
Password updated successfully!
Reloading privilege tables..
... Success!


By default, a MariaDB installation has an anonymous user, allowing anyone
to log into MariaDB without having to have a user account created for
them. This is intended only for testing, and to make the installation
go a bit smoother. You should remove them before moving into a
production environment.

Remove anonymous users? [Y/n]
... Success!

Normally, root should only be allowed to connect from 'localhost'. This
ensures that someone cannot guess at the root password from the network.

Disallow root login remotely? [Y/n]
... Success!

By default, MariaDB comes with a database named 'test' that anyone can
access. This is also intended only for testing, and should be removed
before moving into a production environment.

Remove test database and access to it? [Y/n]
- Dropping test database...
... Success!
- Removing privileges on test database...
... Success!

Reloading the privilege tables will ensure that all changes made so far
will take effect immediately.

Reload privilege tables now? [Y/n]
... Success!

Cleaning up...

All done! If you've completed all of the above steps, your MariaDB
installation should now be secure.

Thanks for using MariaDB!

参考:
Data Matters
MariaDB Setting up
openssl-dev on Ubuntu
Installing MariaDB 10.1 in Debian Jessie and Running Various MariaDB Queries